Using Windows Server Core has some big advantages and to our business the advantage is performance since there is no desktop experience. This makes configuring anything you do more complicated if you are not familiar with the equivelent commands in PowerShell. As you would expect there is no way to use the IIS Wizard for completing a Certificate Request and installing the correct certificates needed to server SSL traffic. With a few commands you will have your traffic ready to be served over SSL with Cloudflare.
Background
You have a Windows Server Core (headless) running IIS and you use CloudFlare as your DNS Gateway. There are a lot of benefits to this but let’s review some of the requirments of CloudFlare before we get started.
To properly take advantage of the features in CloudFlare you must use the CDN and Proxy setting in the CloudFlare DNS tab. This pushes all of your traffic through CloudFlare first and then it sends it to your server. Using this option gives you lots of additional protection that we aren’t going to go into detail here.
Why is this important to understand?
If you do NOT use the CDN and Proxy in your DNS setting, you will not be able to use the Cloud Flare Origin Certificate because it won’t be trusted by the Certificate Authority. It needs to go through their servers to be trusted.
Just make sure you have the Orange CloudFlare logo on your DNS Entry for the website you are trying to secure
The Process
Before we beging, let’s review the steps required to properly set up SSL Bindings on an IIS Web Server with CloudFlare as your DNS Gateway/CDN
- Create a Certifacte Signing Request
- Create the Origin Certificate on CloudFlare
- Import the Origin Certificate on your server
- Import the Root Certifacte Authority (CA) from CloudFlare on your server
- Update IIS Bindings to use new certificate
Certificate Signing Request
Let’s get started by creating our Certificate Signing Request (CSR). This file is needed to supply the correct key information to CloudFlare. RDP (Remote Desktop) onto your server which will show a blank command prompt. Everything we are going to be doing is from Powershell, so launch powershell and we can get started
Creating the CSR has 2 main pieces
- Info File - Containing information about the CSR
- certreq.exe - Program to make the actual CSR
CSR Info File (inf)
The info file specifies what type of Certificate Request you are making. You can be explicit with your domain name or use wildcards. In our example here we are going to use a wildcard
certificate-request.inf
1
2
3
4
5
6
7
8
9
10
11
12
13
14
15
16
17
18
19
20
21
[Version]
Signature= "$Windows NT$"

[NewRequest]
Subject = "CN=*.hoeflingsoftware.com, OU=Hoefling Software, O=Hoefling Software, L=Rochester, S=New York, C=US"
KeySpec = 1
KeyLength = 2048
Exportable = TRUE
MachineKeySet = TRUE
SMIME = False
PrivateKeyArchive = FALSE
UserProtected = FALSE
UseExistingKeySet = FALSE
ProviderName = "Microsoft RSA SChannel Cryptographic Provider"
ProviderType = 12
RequestType = PKCS10
KeyUsage = 0xa0

[EnhancedKeyUsageExtension]

OID=1.3.6.1.5.5.7.3.1
Everything in this file should stay the same except your Subject should be updated with your appropraite infomation. Once you have this file generated you are ready to make your CSR!
Create the Certificate Signing Request
After creating the correct info file, navigate to the same directory in powershell. In our example here we created our info file name ssl.inf.
1
certreq -new ssl.inf ssl.req
This command will generate the CSR which will be located in the file ssl.req. Opening up the file in notepad is how you are going to get the raw CSR. This is an example of what ours looks like:
1
2
3
4
5
6
7
8
9
10
11
12
13
14
15
16
17
18
19
20
21
22
23
24
-----BEGIN NEW CERTIFICATE REQUEST-----
MIIEATCCAukCAQAwgY0xCzAJBgNVBAYTAlVTMREwDwYDVQQIDAhOZXcgWW9yazES
MBAGA1UEBwwJUm9jaGVzdGVyMRowGAYDVQQKDBFIb2VmbGluZyBTb2Z0d2FyZTEa
MBgGA1UECwwRSG9lZmxpbmcgU29mdHdhcmUxHzAdBgNVBAMMFiouaG9lZmxpbmdz
b2Z0d2FyZS5jb20wggEiMA0GCSqGSIb3DQEBAQUAA4IBDwAwggEKAoIBAQCgqvgh
ZdsFZEV8gCpDV+lumMo68Xl2Ir0CMpDx+USNDKi/rWtEjfZUe4KH6IoxdC/q0GtH
odzYnUde/lrY/O2GyZtYx4ajHwmZUhMgAxzPxa7AmLxpBmAOeeujW73b8Fyn5uqI
/stPloB26qvZD+PIGoFVW/A5EdB/2/1A4h6qwyG48UQmLwZWCkfWH+M+qbh2P+mL
5iEVzpS36FI3v9dErPP6SP+7N31EQ6c9HVK2g9QwKAWm+dAMO1ZxiNimujJgpblK
X+vTjb2Uiex1rjA76DenYdFJRH/9GX3TOOSkzAjGIJWSUPZs1bdtJtG3npsEMGxI
Ao6luBQKsRhGKhUpAgMBAAGgggEsMBwGCisGAQQBgjcNAgMxDhYMMTAuMC4xNjI5
OS4yMEMGCSsGAQQBgjcVFDE2MDQCAQkMDnBhLWRldmVsb3BtZW50DBJwYS1kZXZl
bG9wbWVudFxhcHAMC2NlcnRyZXEuZXhlMFMGCSqGSIb3DQEJDjFGMEQwDgYDVR0P
AQH/BAQDAgWgMBMGA1UdJQQMMAoGCCsGAQUFBwMBMB0GA1UdDgQWBBQd0EciwUzw
X3nkxuk87oE4NbYX6jByBgorBgEEAYI3DQICMWQwYgIBAR5aAE0AaQBjAHIAbwBz
AG8AZgB0ACAAUgBTAEEAIABTAEMAaABhAG4AbgBlAGwAIABDAHIAeQBwAHQAbwBn
AHIAYQBwAGgAaQBjACAAUAByAG8AdgBpAGQAZQByAwEAMA0GCSqGSIb3DQEBBQUA
A4IBAQAvkba9jUZ7IH9QbNlAn1vT4vam27tTxDKMghnfj0vHruYHva5+kjJj/xzV
uCcNml11+NptnHOCcezQ2AUTtH5pnZpsSVstIi4JKlNcsEiWsMAAacDv1MAxj0E6
PBvYgQ0D8A3Yt4OUzc1L+oPnj5WLY118ltN+DFk38Zqx23AfvLYPcx8uIjwq8dw7
qgBLGNSOpzpY80nI3i5be8r1GY0d0FJY4YiwJtQxTgau5uijsdqwMdNBBXHngNRP
+6G/Fep440zCy5befDshPO6kzP3WVL3t/uENRphs5PcOYMFOsfEjopO7oqIko9Cb
yUldoFr7Q7b9PbYXANCFMSfhhC9E
-----END NEW CERTIFICATE REQUEST-----
We will need this raw string for when we create our Origin Certificate on the CloudFlare Portal
Origin Certificate on CloudFlare
The Certificate Signing Request (CSR) has been generated successfully from our Web Server. It is now time to create our Origin Certificate from the CloudFlare Portal. Once you log in to the portal navigate to the crypto page.
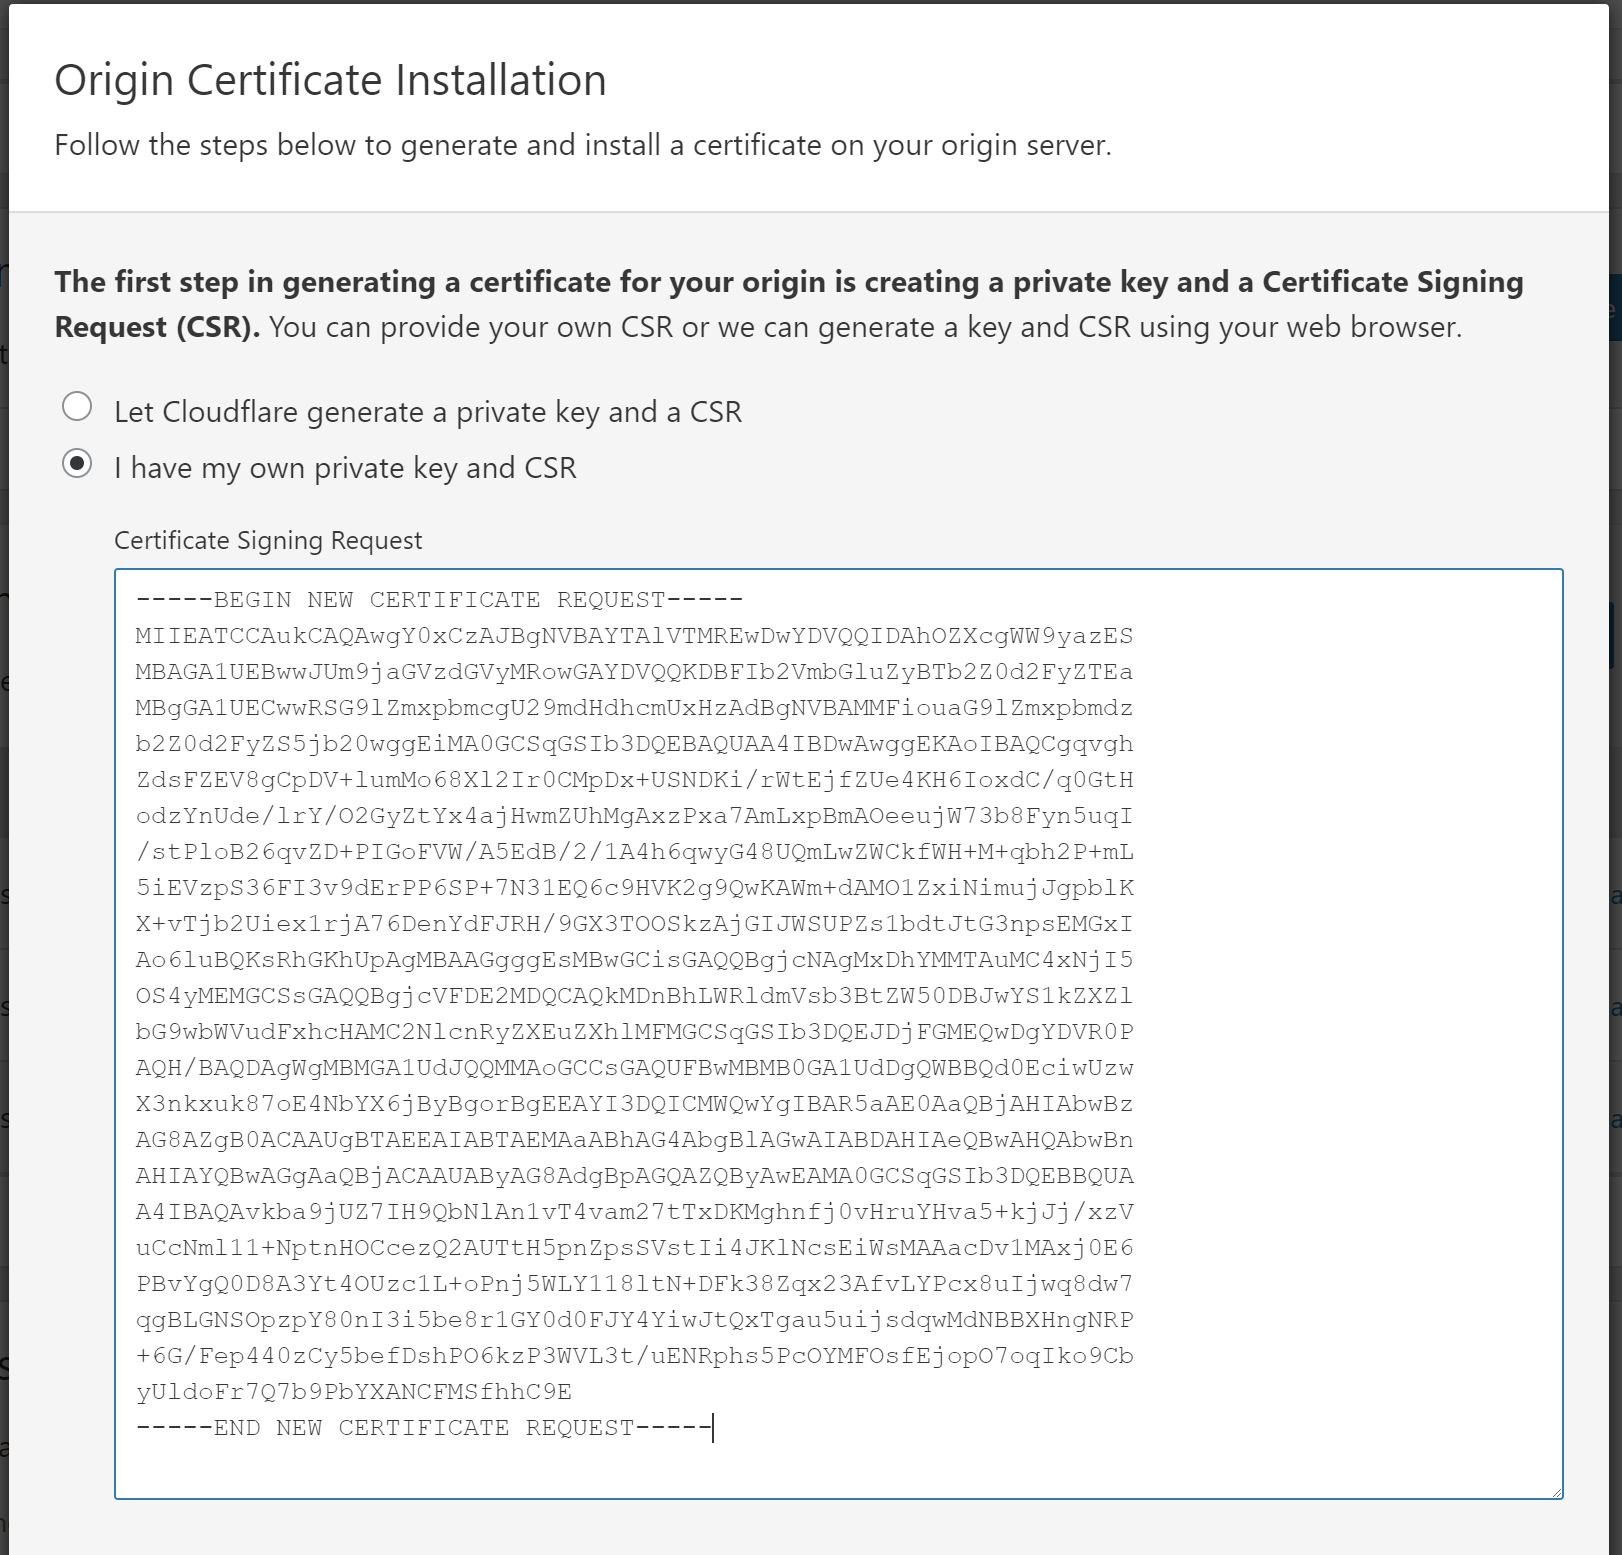
Scroll down on the page to the Origin Certificate section and follow the steps below:
- Click on the Create Certificate button to start the wizard
- The first step asks if you want CloudFlare to create your CSR or if you have your own. We need to use our CSR so select I have my own private key and CSR
- A text field will appear where you will enter the raw CSR we generated earlier. The BEGIN and END lines are required, so copy the ENTIRE
.reqfile that was generated earlier
- Verify your hostnames are correct and have the correct wildcards if you specified wildcards
- Select the correct validity
- Click the Next button
Your Origin Certificate has now been successfully created! Congrats
You should be brought to a screen that has the raw Origin Certificate available for you to copy in the PEM format.
- Copy the Certificate Text with the BEGIN and END lines
- Go back to your Windows Server where you need to install the Origin Certificate
- Open notepad by typing into the console “notepad” and hitting enter
- Paste the certificate data into the editor
- Save the file as “ssl.cer”
Now we have the certificate file on our Windows Server and it is ready to be imported.
Import Origin Certificate
Back over at our Windows Server we have the certificate file saved and it is ready to be imported. Let’s open up powershell and get started.
Our “.cer” file is located at “C:\Users\App\Downloads\ssl.cer”. Execute the following commands:
1
2
PS C:\> cd Cert:\LocalMachine\my
PS Cert:\LocalMachine\My> Import-Certificate C:\Users\App\Downloads\ssl.cer
When you Import the certificate it will display CloudFlare information which is normal this is a Certificate that is running on their system at the end of the day, they are just allowing you to certify your domain with their infomration. Here is what our output looks like:
Import Root Certificate Authority (CA)
Up to this point we have successfully imported our Origin Certificate onto our server, but a requirment of using CloudFlare for SSL is you need to install the CloudFlare Root Certificate Authority (CA) onto the Windows Server. This is really easy to do, so don’t worry too much.
The Root CA was obtained by the CloudFlare docs we copied the certificate we used below to make this easier for you:
Root Certificate Authority (CA)
1
2
3
4
5
6
7
8
9
10
11
12
13
14
15
16
17
18
19
20
21
22
23
24
-----BEGIN CERTIFICATE-----
MIID/DCCAuagAwIBAgIID+rOSdTGfGcwCwYJKoZIhvcNAQELMIGLMQswCQYDVQQG
EwJVUzEZMBcGA1UEChMQQ2xvdWRGbGFyZSwgSW5jLjE0MDIGA1UECxMrQ2xvdWRG
bGFyZSBPcmlnaW4gU1NMIENlcnRpZmljYXRlIEF1dGhvcml0eTEWMBQGA1UEBxMN
U2FuIEZyYW5jaXNjbzETMBEGA1UECBMKQ2FsaWZvcm5pYTAeFw0xNDExMTMyMDM4
NTBaFw0xOTExMTQwMTQzNTBaMIGLMQswCQYDVQQGEwJVUzEZMBcGA1UEChMQQ2xv
dWRGbGFyZSwgSW5jLjE0MDIGA1UECxMrQ2xvdWRGbGFyZSBPcmlnaW4gU1NMIENl
cnRpZmljYXRlIEF1dGhvcml0eTEWMBQGA1UEBxMNU2FuIEZyYW5jaXNjbzETMBEG
A1UECBMKQ2FsaWZvcm5pYTCCASIwDQYJKoZIhvcNAQEBBQADggEPADCCAQoCggEB
AMBIlWf1KEKR5hbB75OYrAcUXobpD/AxvSYRXr91mbRu+lqE7YbyyRUShQh15lem
ef+umeEtPZoLFLhcLyczJxOhI+siLGDQm/a/UDkWvAXYa5DZ+pHU5ct5nZ8pGzqJ
p8G1Hy5RMVYDXZT9F6EaHjMG0OOffH6Ih25TtgfyyrjXycwDH0u6GXt+G/rywcqz
/9W4Aki3XNQMUHNQAtBLEEIYHMkyTYJxuL2tXO6ID5cCsoWw8meHufTeZW2DyUpl
yP3AHt4149RQSyWZMJ6AyntL9d8Xhfpxd9rJkh9Kge2iV9rQTFuE1rRT5s7OSJcK
xUsklgHcGHYMcNfNMilNHb8CAwEAAaNmMGQwDgYDVR0PAQH/BAQDAgAGMBIGA1Ud
EwEB/wQIMAYBAf8CAQIwHQYDVR0OBBYEFCToU1ddfDRAh6nrlNu64RZ4/CmkMB8G
A1UdIwQYMBaAFCToU1ddfDRAh6nrlNu64RZ4/CmkMAsGCSqGSIb3DQEBCwOCAQEA
cQDBVAoRrhhsGegsSFsv1w8v27zzHKaJNv6ffLGIRvXK8VKKK0gKXh2zQtN9SnaD
gYNe7Pr4C3I8ooYKRJJWLsmEHdGdnYYmj0OJfGrfQf6MLIc/11bQhLepZTxdhFYh
QGgDl6gRmb8aDwk7Q92BPvek5nMzaWlP82ixavvYI+okoSY8pwdcVKobx6rWzMWz
ZEC9M6H3F0dDYE23XcCFIdgNSAmmGyXPBstOe0aAJXwJTxOEPn36VWr0PKIQJy5Y
4o1wpMpqCOIwWc8J9REV/REzN6Z1LXImdUgXIXOwrz56gKUJzPejtBQyIGj0mveX
Fu6q54beR89jDc+oABmOgg==
-----END CERTIFICATE-----
Follow these steps to properly install the Root Certificate Authority (CA) onto your Windows Server:
- Log onto your Windows Server and Launch Powershell
- Open up notepad and paste in the Root Certificate Authority (CA) and save it as “cloudflare-root.cer”. We saved ours at “C:\Users\App\Downloads\cloudflare-root.cer”
- Enter the following commands to properly install it in the root certificate folder
1
2
PS C:\> cd Cert:\LocalMachine\root
PS Cert:\LocalMachine\My> Import-Certificate C:\Users\App\Downloads\cloudflare-root.cer
This process should look very familiar to installing the Origin Certificate.
Edit Bindings
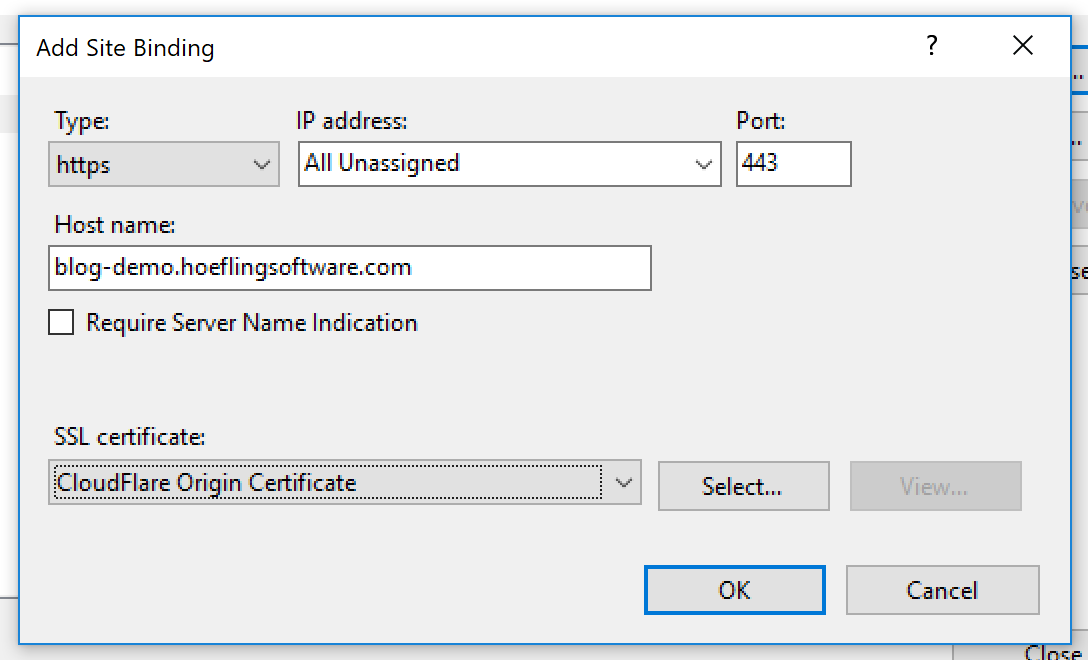
Our Windows Server has now been successfully configured correctly! We can update our IIS Bindings to use the new Origin Certificate and serve our traffic over SSL. You can either do this through Remote IIS Management or through powershell. We still like to manage our websites through Remote IIS Management so just edit your bindings like you normally would and test it out:
Test it Out
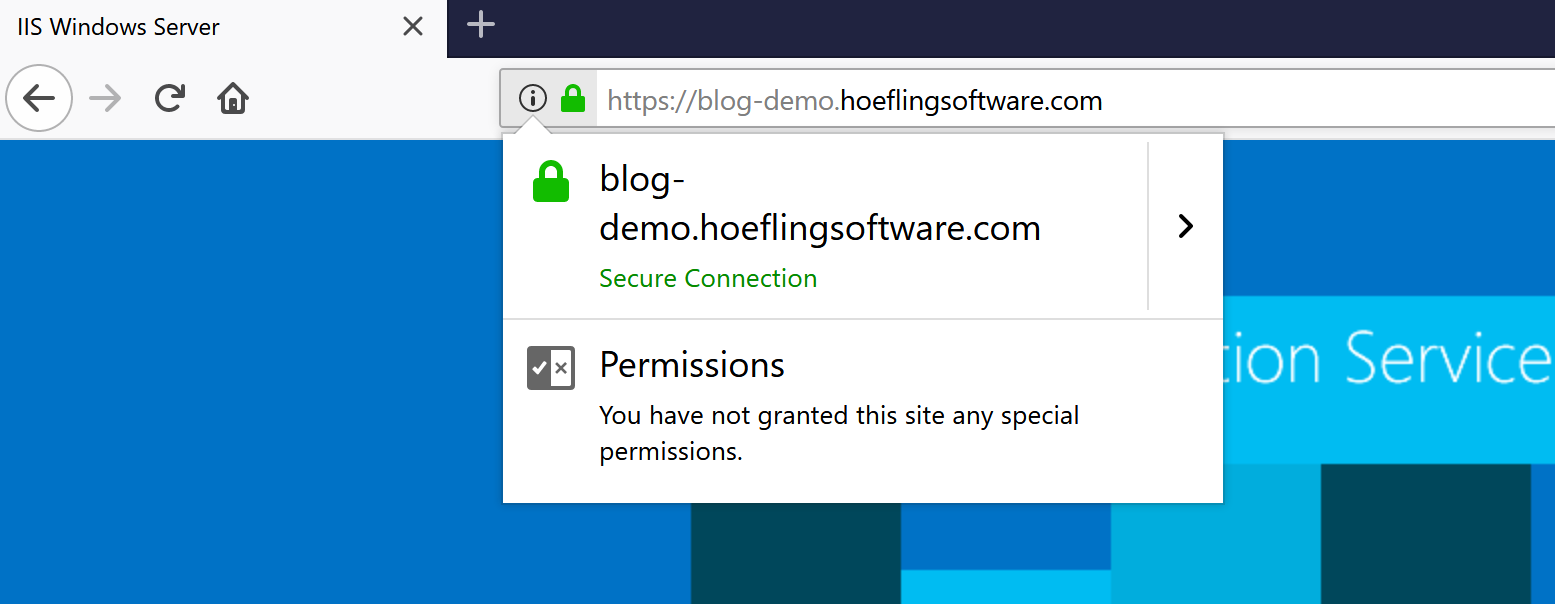
In our case our new web server is https://blog-demo.hoeflingsoftware.com when we navigate to it we should see the secure lock in the browser
Conclusion
That is it!
Now we can start taking advantage of Windows Server Core and serving our websites over SSL with CloudFlare.


