Managing project dependencies can be complicated, from handling shared libraries, 3rd party libraries, homebrew libaries and forks of open source libraries. There is a need for just about every project regardless of size to manage these libraries with a Package Manager. Fortunately most 3rd Party Libraries are on NuGet or some other public Package Management feed so we don’t have to manage them. Getting your private packages on your own private NuGet server is now easier then ever and with the tools built into VSTS you can create automated builds that deploy changes to your libraries to that package management server.
Package Mangement Extension
Visual Studio Team Services (VSTS) has all sorts of extensions that have utilized the APIs provided to help simplify workflows. The Package Mangement Extension can use npm or NuGet, we are going to focus on NuGet.
Add Extension
Let’s get started on installing the Package Management Extension into our VSTS Account!!
- Log into the home page of your VSTS account where the address would be something like http://YourAccount.visualstudio.com/
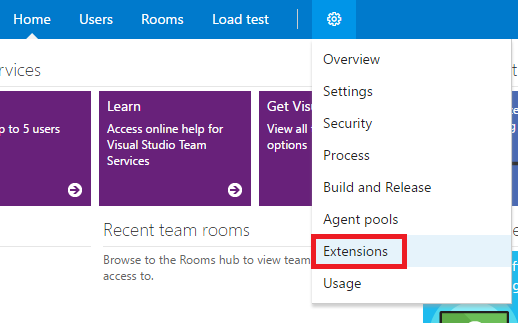
- Navigate to your account settings -> Extensions
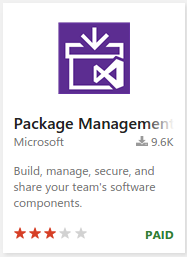
- Select the Package Management Extension and install it
Configure Package Manager
Now that the extension is properly added to your VSTS account let’s configure it.
- Log into the home page of your VSTS account where the address would be something like http://YourAccount.visualstudio.com/
- Navigate to your project that you want to configure
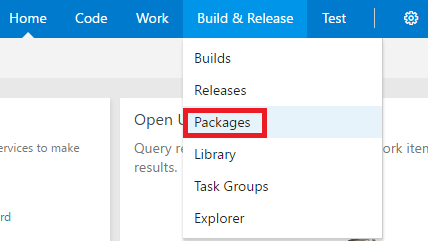
- In the project portal navigate to Build & Release -> Packages
![/assets/img/2016-12-09/VSTS-Extension-Package-Management-Menu.png]()
- Click the
![/assets/img/2016-12-09/VSTS-Extension-Package-Management-New-Feed.png]() button
button - Fill out the New Feed from specifying your Feed Name and Access Rights
- Click the
![/assets/img/2016-12-09/VSTS-Extension-Package-Management-Connect-To-Feed.png]() button to view your connection details to the newly created Package Management Feed, This button will provide everything you need for configuring the NuGet or npm. Feed location, how to get credentials, etc
button to view your connection details to the newly created Package Management Feed, This button will provide everything you need for configuring the NuGet or npm. Feed location, how to get credentials, etc
Build Process
Now that our Package Management Extension is properly installed into our VSTS Account and we have configured our new feed we can start setting up our Build Enviornment to Deploy and Consume packages.
Deploy Package
Depending on your environment it may be useful to deploy pre-release packages vs production ready released packages. A pre-release package could be useful for deploying a dev version of your package for another team to consume while you finish everything up. It is important to note that I ran into lots of issues trying to consume a Pre-Releas package in our Automated Build, so I would recommend using Released Packages over Pre-Release. I’ll let you decide the best pre-release/release process.
To see the differences in building a Release vs Pre-Release package jump to steps 11 and 12 below
- Save the package feed path that we grabbed from the last step of Configure Package Manager, we will need that soon.
- Navigate to your projects Build & Release -> Builds
- Click the
![/assets/img/2016-12-09/VSTS-Build-New.png]() button to start creating a new build.
button to start creating a new build. - In the Create new build definition window select the Visual Studio Build Template
![/assets/img/2016-12-09/VSTS-Build-Template-Visual-Studio.png]()
- Connect the build to the apprioprate source control location and selecte the
![/assets/img/2016-12-09/VSTS-Build-Create.png]() button to create your build template
button to create your build template - Select the
![/assets/img/2016-12-09/VSTS-Build-Add-Step.png]() button and add the following build steps
button and add the following build steps - Package -> NuGet Packager
![/assets/img/2016-12-09/VSTS-NuGet-Packager.png]()
- Package -> NuGet Publisher
![/assets/img/2016-12-09/VSTS-NuGet-Publisher.png]()
- Configure the NuGet Packager
- Select the NuGet Packager Build Step
- Update the
Path to csproj or nuspec file(s) to packto the apprioprate file 12.Specify your Package Folder, I used$(Build.StagingDirectory)\compiledPackages - The next build step depends on this file location so make sure the agent will be able to access the file in both steps.
- If your
.csprojfile has project dependencies make sure you checkInclude referenced projectsunderPack options15,. Choose your deployment mode (Pre-Release) - In
Pack optionsyou will see the option `Automatic package versioning - Select the ‘Use the date and time
- Choose your deployment mode (Release)
- Select
Use the Build Number - Validate that your build number is a proper
#.#.#.#build number, this can be set in the General Tab by specifying the Build Number format - We specify
$(MajorVersion)and$(MinorVersion)in our build variables so our build number looks like this:$(MajorVersion).$(MinorVersion).$(Year:yy)$(DayOfYear)$(Rev:.rr) - Select
NuGet Publisher - Update our
Path/Pattern to nupkgto match the location from step 9 - Ours looks like this:
$(Build.StagingDirectory)\compiledPackages\*.nupkg - Select the
Feed TypeofInternal NuGet Feed - Update the
Internal Feed Urlto the feed location you found from - Save your build and test it out, if your build steps all run successfully you are now deploying new NuGet packages from this build.
- You can configure you build however you want
- When I set this up I chose to update our NuGet package on check in
Going back to your feed defition from earlier will show you a list of all the packages
Pitfalls and Issues
While playing with the Pre-Release package deployment I ran into some issues that you may or may not run into:
- I was not able to consume a pre-release package in a build, yet I was able to consume it through Visual Studio
Consume Package
Now that our package is being deployed properly we need to make some updates to our VSTS Builds that depend on the new NuGet feed. After you go through and update your package sources in Visual Studio and get everything working locally you will notice your build is not working. This is because your build needs an updating NuGet.config file to tell the build where to retrieve it’s packages from.
Update the Config File
- In your Source Directory navigate to your
.nuget/NuGet.configfile - This file is typically not included in your solution
- This file should be located in the root directory
- If this file is not their create the folder
.nugetand the config file inside of itNuGet.config
1
2
3
4
5
6
7
8
9
10
11
<?xml version="1.0" encoding="utf-8"?>
<configuration>
  <packageSources>
    <!-- Public NuGet Feed -->
    <add key="nuget.org" value="https://api.nuget.org/v3/index.json" />


    <!-- Your New Private NuGet Feed -->
    <add key="Your-Feed-Name" value="https://YourAccount.pkgs.visualstudio.com/_packaging/Your-Feed-Name/nuget/v3/index.json" />
  </packageSources>
</configuration>
Update Build
Now that our config file has been updated and checked in, we will need to update our build definition to use our updated .nuget/NuGet.config file.
- Navigate to your project’s Build Definitions
- Select the Build that needs to consume the new packages
- Select your NuGet Package Restore Build Step
![/assets/img/2016-12-09/VSTS-NuGet.png]()
- Update the
Path to NuGet.configby selecting the![/assets/img/2016-12-09/VSTS-Dot-Dot-Dot.png]()
- Test your build out, it should now properly pull your packages from your private NuGet Server
References
This information was compiled through following VSTS/NuGet documentation and personal knowledge of how the build environment works in VSTS


