The Uno Platform Getting Started blog series is a blog series that I put together for October of 2020. It contains several articles that will help you get started building scalable enterprise applications in Uno Platform. Be sure to checkout all the blogs in the series by heading to the 1st article - Uno Platform Getting Started Series
Uno Platform is a cross-platform app development platform that uses C# and the Universal Windows Platform (UWP) to allow developers to build powerful apps for iOS, Android, Windows and the Web. In other words it is a WinUI bridge that enables developers to take their existing UWP skills to the other platforms.
How it Works
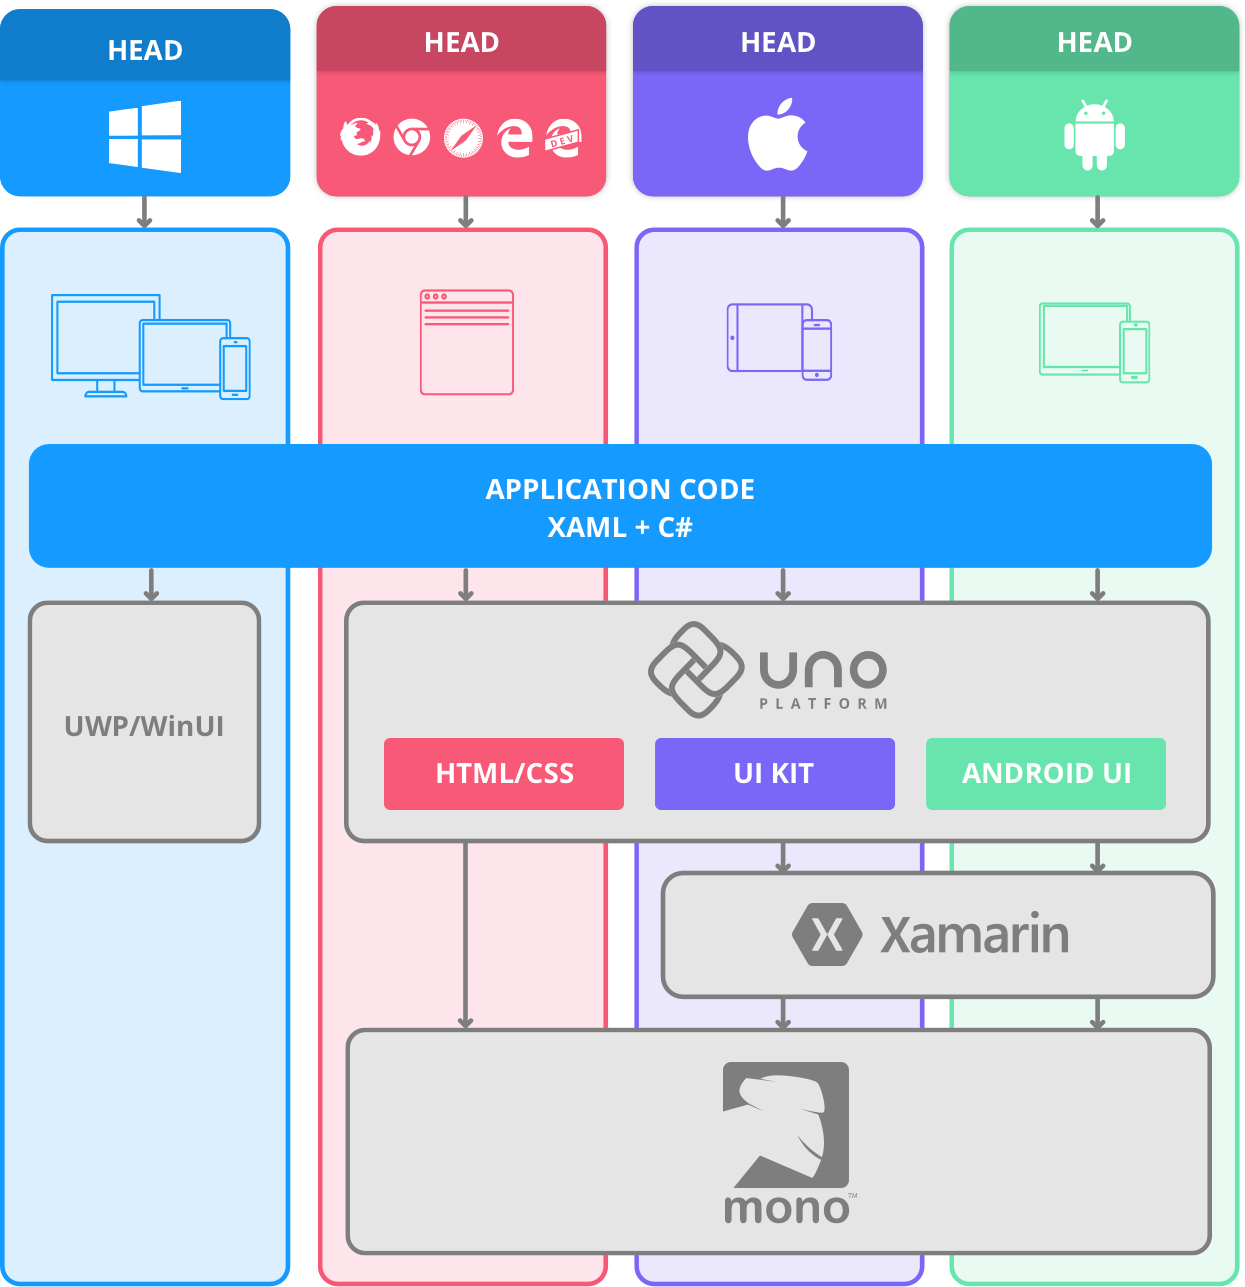
Uno Platform aims to create a WinUI bridge which utilizes the UWP API and Specification to compile code for multiple platforms. The application code is the shared code which is where the UWP specification is used and when compiled under the different platforms it uses the native controls.
Uno has re-implemented the UWP APIs for Android, iOS and WASM so the same exact codebase and that runs on UWP should work on the other platforms. The platform achieves this by using a combination of Xamarin Native and a custom WASM implementation.
Visual Studio Extension
It is strongly recommended to use the Visual Studio Extension to get started as it creates the necessary project heads, shared libraries and adds the required NuGet dependencies. Using File -> New Project is a fairly straight forward process in Uno Platform to get started with working code.
The Uno Extension works just like any Visual Studio Extension, and it creates the necessary project templates to get started. If you have never installed a Visual Studio Extension in the past, just follow the steps below and you will be ready to get started!
- Shutdown Visual Studio
- Download the extension installer
- Install the extension
- Start Visual Studio
File > New Project
After the Uno Visual Studio Extension is installed you can Launch Visual Studio and start creating a new project. In the project templates search for Uno and you should see 2 projects.
- Cross-Platform Library (Uno Platform)
- Cross-Platform App (Uno Platform)
Make sure you select Cross-Platform App (Uno Platform)
Project Overview
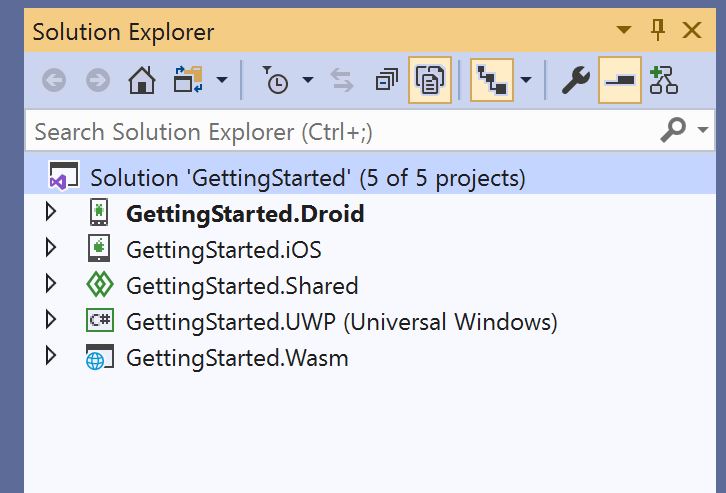
I have created a new Uno Platform Project called GettingStarted which I will reference below. At first glance after creating the solution we have 5 projecs
- GettingStarted.Droid (Android Head)
- GettingStarted.iOS (iOS Head)
- GettingStarted.UWP (UWP Head)
- GettingStarted.WASM (WASM Head)
- GettingStarted.Shared (Shared Code)
If you are new to cross-platform development some terms may be a bit confusing. There are 2 major types of projects or areas of a code base
- Project Head - The platform specific project that compiles the application into the native code. Examples for uno are Android, iOS, UWP, and WASM
- Shared Code - The main application code that is shared across the project heads. The shared code can be compiled across many platforms.
UWP Project Head
The UWP Project Head is the easiest to understand, because there is nothing special introduced by the Uno Platform to get it to work. Since Uno Platform is a WinUI Bridge the UWP project head works out of the box. Something different from a traditional UWP project is the use of the shared code.
There is no App.xaml or App.xaml.cs in the UWP Project Head as this code lives 100% in the shared code.
iOS Project Head
The iOS Project Head uses a very simple entry point to try and leverage as much shared code as possible. The template creates a Main.cs which is an iOS AppDelegate, this class is responsible to starting the application. In the case of the iOS Project Head for Uno, it just creates an instance of App and let’s the shared code manage the rest.
1
2
3
4
5
6
7
8
9
10
11
12
13
14
15
using UIKit;

namespace GettingStarted.iOS
{
    public class Application
    {
        // This is the main entry point of the application.
        static void Main(string[] args)
        {
            // if you want to use a different Application Delegate class from "AppDelegate"
            // you can specify it here.
            UIApplication.Main(args, null, typeof(App));
        }
    }
}
Android Project Head
The Android Project Head is a little bit more complicated than iOS and UWP by the nature of the platform. There are 2 classes generated which start the Uno Application
- Main.cs - Orchestrates application initialization and creates the default Activity
- MainActivity.cs - The Activity used by Android
In the Android Ecosystem an Activity can be thought of as a Page and you need at least 1 Activity to run your application. This is a very basic understanding of the Android Ecosystem, but should explain why we need both Main.cs and MainActivity.cs.
MainActivity
1
2
3
4
5
6
7
8
9
10
11
12
13
14
15
using Android.App;
using Android.Content.PM;
using Android.Views;

namespace GettingStarted.Droid
{
    [Activity(
            MainLauncher = true,
            ConfigurationChanges = ConfigChanges.Orientation | ConfigChanges.ScreenSize,
            WindowSoftInputMode = SoftInput.AdjustPan | SoftInput.StateHidden
        )]
    public class MainActivity : Windows.UI.Xaml.ApplicationActivity
    {
    }
}
The MainActivity duplicates many of the Android APIs which allows the developer to use the same APIs that they would in a UWP application. By using an Activity that inherits Windows.UI.Xaml.ApplicationActivity you gain access to the UWP Specification.
Main
1
2
3
4
5
6
7
8
9
10
11
12
13
14
15
16
17
18
19
20
21
22
23
24
25
26
27
28
29
30
31
32
33
34
using System;
using Android.Runtime;
using Com.Nostra13.Universalimageloader.Core;
using Windows.UI.Xaml.Media;

namespace GettingStarted.Droid
{
    [global::Android.App.ApplicationAttribute(
        Label = "@string/ApplicationName",
        LargeHeap = true,
        HardwareAccelerated = true,
        Theme = "@style/AppTheme"
    )]
    public class Application : Windows.UI.Xaml.NativeApplication
    {
        public Application(IntPtr javaReference, JniHandleOwnership transfer)
            : base(() => new App(), javaReference, transfer)
        {
            ConfigureUniversalImageLoader();
        }

        private void ConfigureUniversalImageLoader()
        {
            // Create global configuration and initialize ImageLoader with this config
            ImageLoaderConfiguration config = new ImageLoaderConfiguration
                .Builder(Context)
                .Build();

            ImageLoader.Instance.Init(config);

            ImageSource.DefaultImageLoader = ImageLoader.Instance.LoadImageAsync;
        }
    }
}
WASM Project Head
The WASM Project Head (Web Assembly) is not as complicated as the Android Project Head. It uses special WASM specific APIs to map to the UWP Specification while still using WASM. The project head contains a Program.cs with a Main method to initialize the application.
1
2
3
4
5
6
7
8
9
10
11
12
13
14
namespace GettingStarted.Wasm
{
    public class Program
    {
        private static App _app;

        static int Main(string[] args)
        {
            Windows.UI.Xaml.Application.Start(_ => _app = new App());

            return 0;
        }
    }
}
Shared Code
The Shared Code is where the majority of your application code live. Since the Uno Platform is creating a WinUI Bridge the shared code is going to look almost identical to a UWP.
Platform Specific Code
While the majority of your code is going to be considered Shared Code which will be natively compiled across the different platforms, there will be times when your application needs to use native APIs. Leveraging the native APIs is often required when there is a feature gap in what the UWP Bridge supports and what is possible on the platform you are targetting.
Fortunately there are recommended techniques for writing platform specific code in Uno’s shared code base.
C# Code
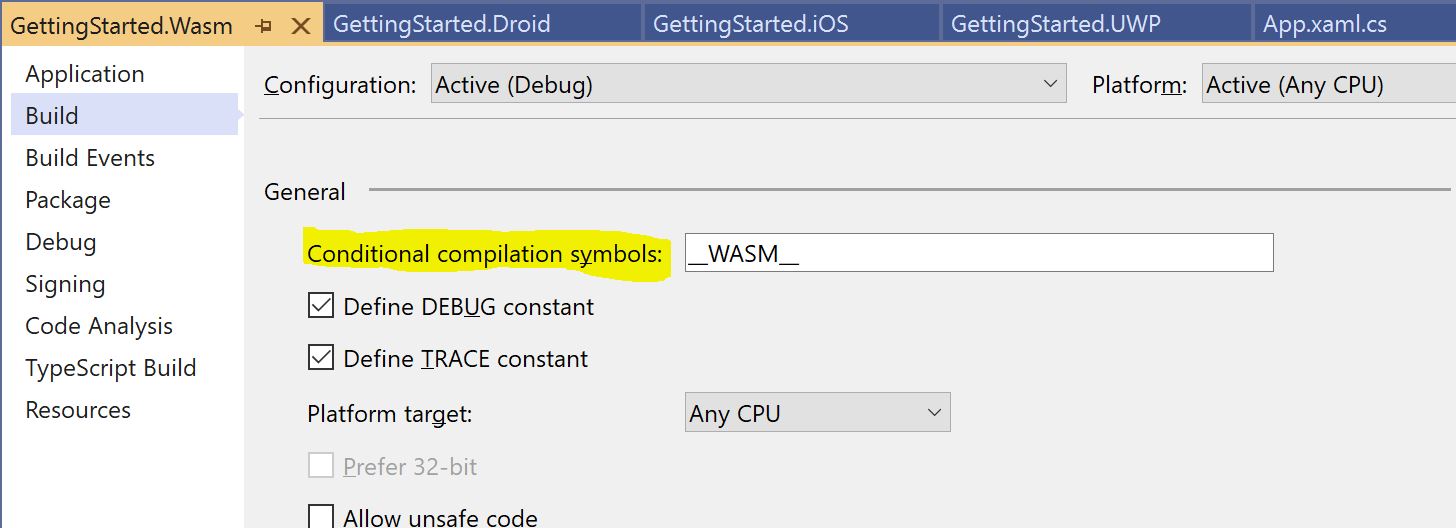
The biggest thing to understand when working on Shared Code is preprocessor directives (Conditional Compilation). Since the Shared Code isn’t compiling it’s own project, it is just being included in the Project Head codebase it allows you to easily add preprocessor directives to only compile some code for iOS vs Android vs UWP vs WASM. Knowing the syntax for this is important:
- Android -
__ANDROID__ - iOS -
__IOS__ - UWP -
NETFX_CORE - WASM -
__WASM__
To use the preprocessor directive you simply add #if {PLATFORM}. The example below will print Hello World for each platform.
1
2
3
4
5
6
7
8
9
#if __ANDROID__
    Console.WriteLine("Hello Android");
#elif __IOS__
    Console.WriteLine("Hello iOS");
#elif __WASM__
    Console.WriteLine("Hello WASM");
#elif NETFX_CORE
    Console.WriteLine("Hello Windows");
#endif
If you ever forget the platform specific Conditional Compilation you can reference the Uno Docs or open the project build settings in the properties.
XAML Code
My favorite feature in Uno Platform
Uno Platform uses the UWP XAML Specification, by using custom XML Namespaces you can easily add controls that will only render on specific platforms. Again all of this information is easily found on the Uno Documentation Page
In each page you want to customize, add any of the following namespaces
- android -
http://uno.ui/android - ios -
http://uno.ui/ios - wasm -
http://uno.ui/wasm - win -
http://schemas.microsoft.com/winfx/2006/xaml/presentation
Then in your markup just add the xmlns (XML Namespace) prior to the control
1
<android:TextBlock Text="Hello Android" />
MainPage.xaml
1
2
3
4
5
6
7
8
9
10
11
12
13
14
15
16
17
18
19
<Page
    x:Class="GettingStarted.MainPage"
    xmlns="http://schemas.microsoft.com/winfx/2006/xaml/presentation"
    xmlns:x="http://schemas.microsoft.com/winfx/2006/xaml"
    xmlns:android="http://uno.ui/android"
    xmlns:ios="http://uno.ui/ios"
    xmlns:wasm="http://uno.ui/wasm"
    xmlns:win="http://schemas.microsoft.com/winfx/2006/xaml/presentation"
    xmlns:d="http://schemas.microsoft.com/expression/blend/2008"
    xmlns:mc="http://schemas.openxmlformats.org/markup-compatibility/2006"
    mc:Ignorable="d android ios wasm">

    <Grid Background="{ThemeResource ApplicationPageBackgroundThemeBrush}">
        <android:TextBlock Text="Hello Android!" />
        <ios:TextBlock Text="Hello iOS!" />
        <wasm:TextBlock Text="Hello WASM!" />
        <win:TextBlock Text="Hello UWP!" />
    </Grid>
</Page>
Don’t forget to add android, ios, and wasm to your mc:ignorable, if you don’t you may run into compile issues.
Native API Access
Another amazing feature that is a close 2nd to XAML Platform Specific Code
The architecture of Uno Platform allows each element to gain access to Native APIs, this is an advantage of the Shared Projects. In the Uno Platform code they use a combination of conditional compilation and partial classes which generates an API that appears the same, but the underlying parent classes are the native implementation.
For example a simple TextBlock on Android has a parent class of Android.Views.ViewGroup. All of the APIs that exist in the Android ViewGroup are now available on the TextBlock. Suppose you want to get the exact screen position of the TextBlock on Android print that to the console.
1
2
3
4
5
6
7
8
9
10
11
12
13
14
15
16
17
public sealed partial class MainPage : Page
{
    public MainPage()
    {
        this.InitializeComponent();
    }

    protected override void OnNavigatedTo(NavigationEventArgs e)
    {
        base.OnNavigatedTo(e);

#if __ANDROID__
        int[] position = new int[2];
        MyTextBlock.GetLocationOnScreen(position);
        Console.WriteLine($"MyTextBloc Position x:{position[0]}, y:{position[1]}");
#endif
    }
In this example GetLocationOnScreen is an Android Native API for accessing the X/Y position of an Android View on the screen. This is really useful when performing advanced UI calculations. In our case here we are able to get the X/Y position and perform other operations in the shared code afterwards.
Conclusion
Our goal was to give you an overview of the Uno Platform project structure and demonstrate some techniques for writing shared code and native code side-by-side. The biggest advantage I have seen while using Uno Platform is the power of the Platform Specific Code techniques.
Useful Links:
-Happy Coding


