The Uno Platform Getting Started blog series is a blog series that I put together for October of 2020. It contains several articles that will help you get started building scalable enterprise applications in Uno Platform. Be sure to checkout all the blogs in the series by heading to the 1st article - Uno Platform Getting Started Series
Tabbed pages is a best practice in modern application development which holds true especially for the smaller form factors such as mobile apps. Uno Platform is a UWP bridge for building cross platform apps in Windows, iOS, Android, MacOS, Web Assembly, and more. There are predefined controls built into the UWP library and WinUI that simplify this task, which enables you the developer to worry about business rules.
The UWP CommandBar
The CommandBar in UWP is a powerful tool that is used for building App Bars or Tab Bars that are typically at the top of the user interface or at the bottom of the user interface. The API allows for quick and easy design, giving the developer plenty of options for expanding it as the business rules change. It is always best to refer to the documentation before using these controls. Microsoft has done a good job documenting these items.
Aren’t we learning about the Uno Platform?
Yes, we are learning about Uno Platform. When using controls from UWP or WinUI it is always best to refer to the official docs. Uno Platform has a high feature parity which means they only need to document things that are Uno Platform specific.
Goals
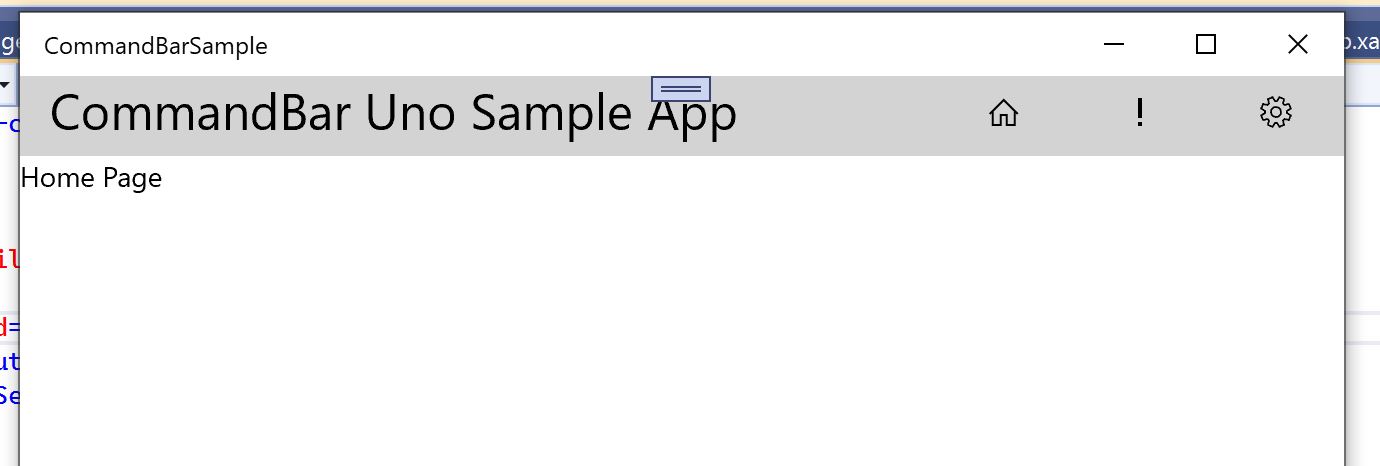
Today we are going to build a simple Uno Platform app that targets iOS, Android, UWP, and Web Assembly. This app will use the UWP CommandBar to handle the tab bar that will be rendered at the top of the page. When you are done, you should have something that looks like the screenshot below.
New Project
Let’s get started with a new Uno Platform project! If you haven’t already done so, I highly recommend downloading the Uno Platform Visual Studio extension. It comes with the necessary template to start building Uno Platform projects.
Now go ahead and create a new Uno Platform project and we can get started!
If you are new to Uno Platform development, the official recommendation from the team is to build in UWP first then test in the other platforms. The developer loop is the fastest in UWP vs the other platforms.
Organize Views
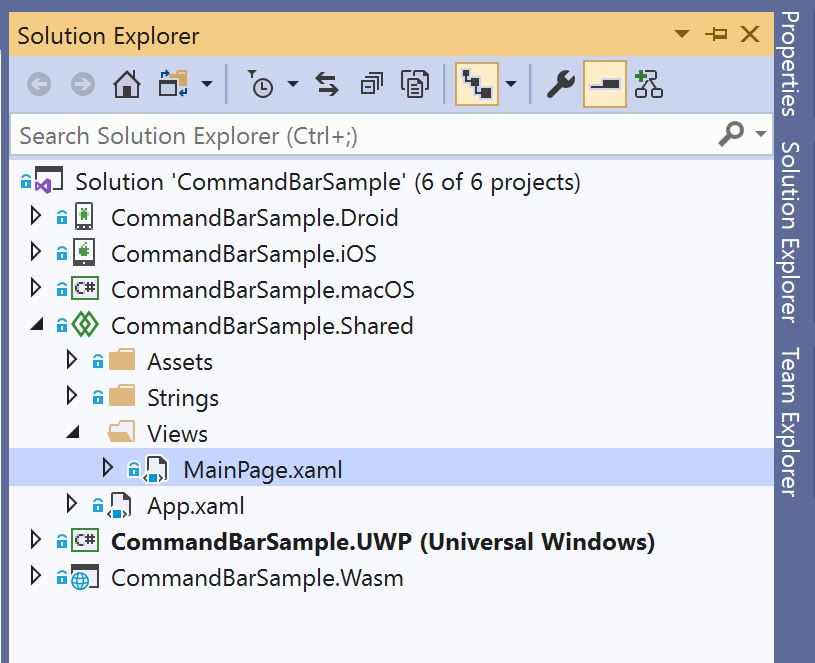
I personally like to have all of my views or pages in the Views namespace. This article will be making the assumption that you will be doing that as well. In your shared project go ahead and create a Views folder, move your MainPage.xaml into the folder and update your namespaces.
MainPage.xaml
1
2
3
4
5
6
7
8
9
10
11
12
13
<Page
    x:Class="CommandBarSample.Shared.Views.MainPage"
    xmlns="http://schemas.microsoft.com/winfx/2006/xaml/presentation"
    xmlns:x="http://schemas.microsoft.com/winfx/2006/xaml"
    xmlns:d="http://schemas.microsoft.com/expression/blend/2008"
    xmlns:mc="http://schemas.openxmlformats.org/markup-compatibility/2006"
    mc:Ignorable="d">

    <Grid Background="{ThemeResource ApplicationPageBackgroundThemeBrush}">
        <TextBlock Text="Hello, world!" Margin="20" FontSize="30" />
    </Grid>

</Page>
MainPage.xaml.cs
1
2
3
4
5
6
7
8
9
10
namespace CommandBarSample.Views
{
    public sealed partial class MainPage : Page
    {
        public MainPage()
        {
            this.InitializeComponent();
        }
    }
}
Update App.xaml.cs
Once you move the MainPage.xaml and MainPage.xaml.cs and update the namespaces, you will need to update the App.xaml.cs. In the App.xaml.cs file just add the following namespace.
1
using CommandBarSample.Shared.Views;
There is a lot of code in this file that gets generated from the Visual Studio template. If you want to compare it to my file, here is the full App.xaml.cs.
1
2
3
4
5
6
7
8
9
10
11
12
13
14
15
16
17
18
19
20
21
22
23
24
25
26
27
28
29
30
31
32
33
34
35
36
37
38
39
40
41
42
43
44
45
46
47
48
49
50
51
52
53
54
55
56
57
58
59
60
61
62
63
64
65
66
67
68
69
70
71
72
73
74
75
76
77
78
79
80
81
82
83
84
85
86
87
88
89
90
91
92
93
94
95
96
97
98
99
100
101
102
103
104
105
106
107
108
109
110
111
112
113
114
115
116
117
118
119
120
121
122
123
124
125
126
127
128
129
130
131
132
133
134
135
136
137
138
139
140
141
142
143
144
145
146
147
148
149
150
151
152
153
154
using System;
using Microsoft.Extensions.Logging;
using Windows.ApplicationModel;
using Windows.ApplicationModel.Activation;
using Windows.UI.Xaml;
using Windows.UI.Xaml.Controls;
using Windows.UI.Xaml.Navigation;
using CommandBarSample.Shared.Views;

namespace CommandBarSample
{
    /// <summary>
    /// Provides application-specific behavior to supplement the default Application class.
    /// </summary>
    sealed partial class App : Application
    {
        /// <summary>
        /// Initializes the singleton application object.  This is the first line of authored code
        /// executed, and as such is the logical equivalent of main() or WinMain().
        /// </summary>
        public App()
        {
            ConfigureFilters(global::Uno.Extensions.LogExtensionPoint.AmbientLoggerFactory);

            this.InitializeComponent();
            this.Suspending += OnSuspending;
        }

        /// <summary>
        /// Invoked when the application is launched normally by the end user.  Other entry points
        /// will be used such as when the application is launched to open a specific file.
        /// </summary>
        /// <param name="e">Details about the launch request and process.</param>
        protected override void OnLaunched(LaunchActivatedEventArgs e)
        {
#if DEBUG
            if (System.Diagnostics.Debugger.IsAttached)
            {
                // this.DebugSettings.EnableFrameRateCounter = true;
            }
#endif
            Frame rootFrame = Windows.UI.Xaml.Window.Current.Content as Frame;

            // Do not repeat app initialization when the Window already has content,
            // just ensure that the window is active
            if (rootFrame == null)
            {
                // Create a Frame to act as the navigation context and navigate to the first page
                rootFrame = new Frame();

                rootFrame.NavigationFailed += OnNavigationFailed;

                if (e.PreviousExecutionState == ApplicationExecutionState.Terminated)
                {
                    //TODO: Load state from previously suspended application
                }

                // Place the frame in the current Window
                Windows.UI.Xaml.Window.Current.Content = rootFrame;
            }

            if (e.PrelaunchActivated == false)
            {
                if (rootFrame.Content == null)
                {
                    // When the navigation stack isn't restored navigate to the first page,
                    // configuring the new page by passing required information as a navigation
                    // parameter
                    rootFrame.Navigate(typeof(MainPage), e.Arguments);
                }
                // Ensure the current window is active
                Windows.UI.Xaml.Window.Current.Activate();
            }
        }

        /// <summary>
        /// Invoked when Navigation to a certain page fails
        /// </summary>
        /// <param name="sender">The Frame which failed navigation</param>
        /// <param name="e">Details about the navigation failure</param>
        void OnNavigationFailed(object sender, NavigationFailedEventArgs e)
        {
            throw new Exception($"Failed to load {e.SourcePageType.FullName}: {e.Exception}");
        }

        /// <summary>
        /// Invoked when application execution is being suspended.  Application state is saved
        /// without knowing whether the application will be terminated or resumed with the contents
        /// of memory still intact.
        /// </summary>
        /// <param name="sender">The source of the suspend request.</param>
        /// <param name="e">Details about the suspend request.</param>
        private void OnSuspending(object sender, SuspendingEventArgs e)
        {
            var deferral = e.SuspendingOperation.GetDeferral();
            //TODO: Save application state and stop any background activity
            deferral.Complete();
        }


        /// <summary>
        /// Configures global logging
        /// </summary>
        /// <param name="factory"></param>
        static void ConfigureFilters(ILoggerFactory factory)
        {
            factory
                .WithFilter(new FilterLoggerSettings
                    {
                        { "Uno", LogLevel.Warning },
                        { "Windows", LogLevel.Warning },

                        // Debug JS interop
                        // { "Uno.Foundation.WebAssemblyRuntime", LogLevel.Debug },

                        // Generic Xaml events
                        // { "Windows.UI.Xaml", LogLevel.Debug },
                        // { "Windows.UI.Xaml.VisualStateGroup", LogLevel.Debug },
                        // { "Windows.UI.Xaml.StateTriggerBase", LogLevel.Debug },
                        // { "Windows.UI.Xaml.UIElement", LogLevel.Debug },

                        // Layouter specific messages
                        // { "Windows.UI.Xaml.Controls", LogLevel.Debug },
                        // { "Windows.UI.Xaml.Controls.Layouter", LogLevel.Debug },
                        // { "Windows.UI.Xaml.Controls.Panel", LogLevel.Debug },
                        // { "Windows.Storage", LogLevel.Debug },

                        // Binding related messages
                        // { "Windows.UI.Xaml.Data", LogLevel.Debug },

                        // DependencyObject memory references tracking
                        // { "ReferenceHolder", LogLevel.Debug },

                        // ListView-related messages
                        // { "Windows.UI.Xaml.Controls.ListViewBase", LogLevel.Debug },
                        // { "Windows.UI.Xaml.Controls.ListView", LogLevel.Debug },
                        // { "Windows.UI.Xaml.Controls.GridView", LogLevel.Debug },
                        // { "Windows.UI.Xaml.Controls.VirtualizingPanelLayout", LogLevel.Debug },
                        // { "Windows.UI.Xaml.Controls.NativeListViewBase", LogLevel.Debug },
                        // { "Windows.UI.Xaml.Controls.ListViewBaseSource", LogLevel.Debug }, //iOS
                        // { "Windows.UI.Xaml.Controls.ListViewBaseInternalContainer", LogLevel.Debug }, //iOS
                        // { "Windows.UI.Xaml.Controls.NativeListViewBaseAdapter", LogLevel.Debug }, //Android
                        // { "Windows.UI.Xaml.Controls.BufferViewCache", LogLevel.Debug }, //Android
                        // { "Windows.UI.Xaml.Controls.VirtualizingPanelGenerator", LogLevel.Debug }, //WASM
                    }
                )
#if DEBUG
                .AddConsole(LogLevel.Debug);
#else
                .AddConsole(LogLevel.Information);
#endif
        }
    }
}
Create Tabbed Pages
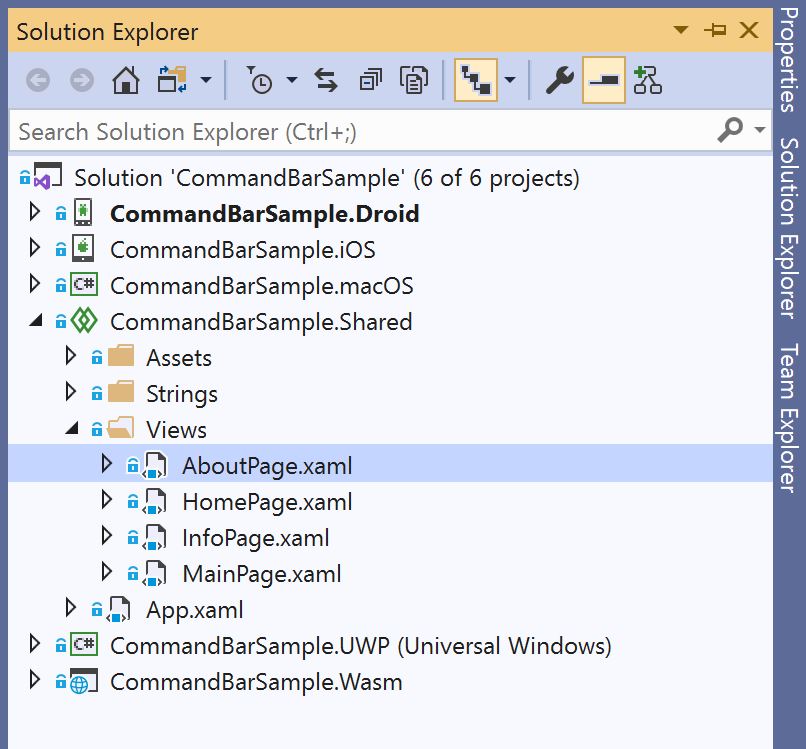
To get started, let’s focus our attention on creating the actual tabs. In this sample let’s create the following pages for our app.
- HomePage
- InfoPage
- AboutPage
Let’s add these pages with a default hello world statement displaying on the page.
HomePage
1
2
3
4
5
6
7
8
9
10
11
12
13
14
<Page
    x:Class="CommandBarSample.Shared.Views.HomePage"
    xmlns="http://schemas.microsoft.com/winfx/2006/xaml/presentation"
    xmlns:x="http://schemas.microsoft.com/winfx/2006/xaml"
    xmlns:d="http://schemas.microsoft.com/expression/blend/2008"
    xmlns:mc="http://schemas.openxmlformats.org/markup-compatibility/2006"
    mc:Ignorable="d"
    Background="{ThemeResource ApplicationPageBackgroundThemeBrush}">

    <StackPanel>
        <TextBlock Text="Home Page" />
    </StackPanel>

</Page>
InfoPage
1
2
3
4
5
6
7
8
9
10
11
12
13
14
<Page
    x:Class="CommandBarSample.Shared.Views.InfoPage"
    xmlns="http://schemas.microsoft.com/winfx/2006/xaml/presentation"
    xmlns:x="http://schemas.microsoft.com/winfx/2006/xaml"
    xmlns:d="http://schemas.microsoft.com/expression/blend/2008"
    xmlns:mc="http://schemas.openxmlformats.org/markup-compatibility/2006"
    mc:Ignorable="d"
    Background="{ThemeResource ApplicationPageBackgroundThemeBrush}">

    <StackPanel>
        <TextBlock Text="Info Page" />
    </StackPanel>

</Page>
AboutPage
1
2
3
4
5
6
7
8
9
10
11
12
13
14
<Page
    x:Class="CommandBarSample.Shared.Views.AboutPage"
    xmlns="http://schemas.microsoft.com/winfx/2006/xaml/presentation"
    xmlns:x="http://schemas.microsoft.com/winfx/2006/xaml"
    xmlns:d="http://schemas.microsoft.com/expression/blend/2008"
    xmlns:mc="http://schemas.openxmlformats.org/markup-compatibility/2006"
    mc:Ignorable="d"
    Background="{ThemeResource ApplicationPageBackgroundThemeBrush}">

    <StackPanel>
        <TextBlock Text="About Page" />
    </StackPanel>

</Page>
When you are done your solution explorer should look like the screenshot below.
CommandBar Implementation
Now that we have created all of our pages we are ready to implement our CommandBar. We are going to split this implementation into a few tasks to make it easier to understand.
- Add
CommandBartoMainPage - Add Tabs to the
CommandBar - Implement Tabs in Code Behind
Add CommandBar to MainPage
We have all the pages created and we can now implement our CommandBar in the MainPage. Let’s get started by creating a simple CommandBar with a title. Update the <Grid> to be a <StackPanel> this will respect a vertical layout with no overlapping controls. Once you do that add the following code just your above your TextBlock.
1
2
3
4
5
6
7
8
9
10
11
<StackPanel Background="{ThemeResource ApplicationPageBackgroundThemeBrush}">

    <CommandBar>
        <CommandBar.Content>
            <TextBlock Text="CommandBar Sample" />
        </CommandBar.Content>
    </CommandBar>

    <TextBlock Text="Hello, world!" Margin="20" FontSize="30" />

</StackPanel>
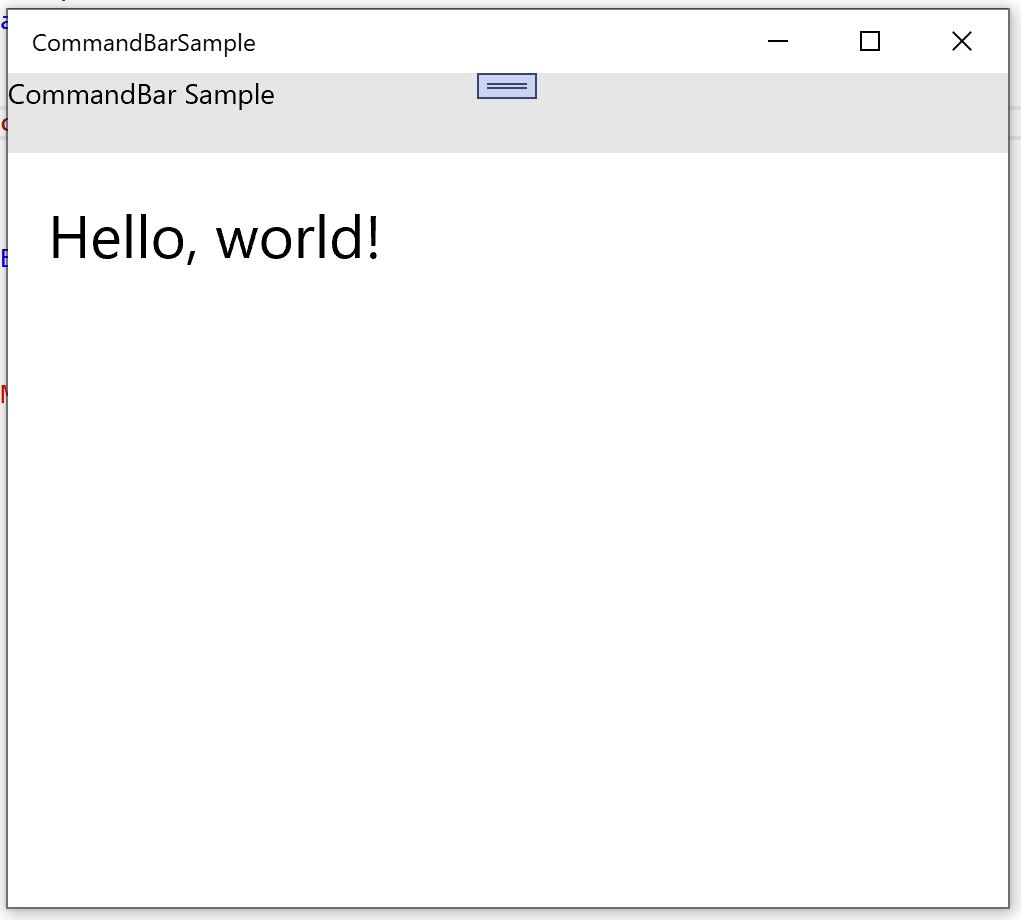
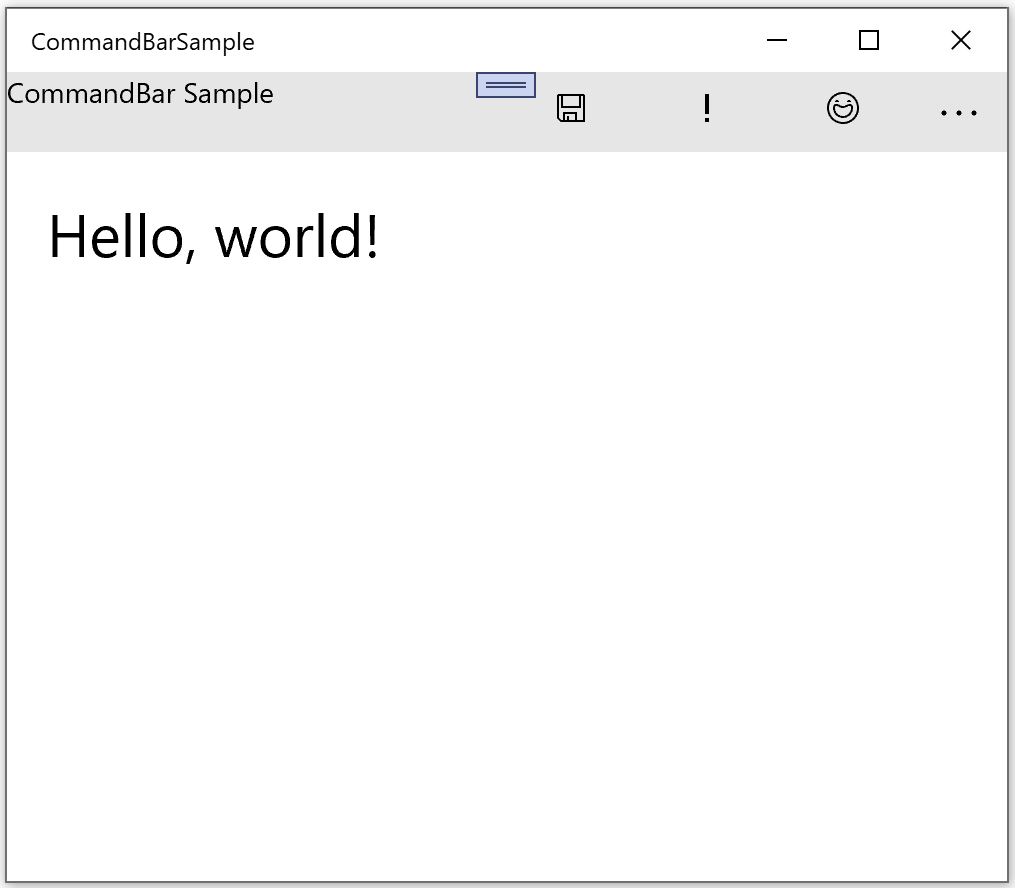
Once that is completed, you can run the application. I am going to run it in UWP for testing purposes. You will now see the CommandBar rendering with our title.
Add Tabs to the CommandBar
Our CommandBar is rendering correctly, it is not time to add our tab buttons to the page. The CommandBar accepts <AppBarButton> as a list of commands that can be added to the <CommandBar.PrimaryCommands>. Let’s update our code to match the following snippet.
1
2
3
4
5
6
7
8
9
10
11
12
13
14
15
16
17
18
<StackPanel Background="{ThemeResource ApplicationPageBackgroundThemeBrush}">

    <CommandBar>

        <CommandBar.PrimaryCommands>
            <AppBarButton Content="Home" Tag="Home" Icon="Save" />
            <AppBarButton Content="Info" Tag="Info" Icon="Important" />
            <AppBarButton Content="About" Tag="About" Icon="Emoji" />
        </CommandBar.PrimaryCommands>

        <CommandBar.Content>
            <TextBlock Text="CommandBar Sample" />
        </CommandBar.Content>
    </CommandBar>

    <TextBlock Text="Hello, world!" Margin="20" FontSize="30" />

</StackPanel>
Don’t worry too much about the icons, the nice thing working with Uno Platform and UWP is you get an icon library loaded in by default. Once you add the buttons, you can test your app in UWP and it should look like the following screenshot.
Implement Tabs in Code Behind
The user interface is now complete but we need to write some code to manage the tabs. Don’t get scared about managing your tabs, the code isn’t that scary and it will give you the most flexibility to change your user interface in the future.
Let’s start by updating our MainPage.xaml to replace the <TextBlock> control with a named <Frame> control
1
<Frame x:Name="contentView" />
Complete MainPage.xaml
1
2
3
4
5
6
7
8
9
10
11
12
13
14
15
16
17
18
<StackPanel Background="{ThemeResource ApplicationPageBackgroundThemeBrush}">

    <CommandBar>

        <CommandBar.PrimaryCommands>
            <AppBarButton Content="Home" Tag="Home" Icon="Save" />
            <AppBarButton Content="Info" Tag="Info" Icon="Important" />
            <AppBarButton Content="About" Tag="About" Icon="Emoji" />
        </CommandBar.PrimaryCommands>

        <CommandBar.Content>
            <TextBlock Text="CommandBar Sample" />
        </CommandBar.Content>
    </CommandBar>

    <Frame x:Name="contentView" />

</StackPanel>
Once you have added the <Frame> open up the MainPage.xaml.cs and add the following event method stub.
1
2
3
4
void OnAppBarButtonTapped(object sender, RoutedEventArgs args)
{
    // todo - implement event handler
}
Now go and connect the <AppBarButton> to the new event handler.
1
2
3
4
5
<CommandBar.PrimaryCommands>
    <AppBarButton Content="Home" Tag="Home" Icon="Save" Click="OnAppBarButtonTapped" />
    <AppBarButton Content="Info" Tag="Info" Icon="Important" Click="OnAppBarButtonTapped" />
    <AppBarButton Content="About" Tag="About" Icon="Emoji" Click="OnAppBarButtonTapped" />
</CommandBar.PrimaryCommands>
Ensure you add the exact same event handler to each <AppBarButton>. They will all use the same method in the code behind. The event handler method can determine which button was pressed by using the Tag property which we will go over during the implementation.
It is now time to implement our event handler. We will use the <Frame> control we added earlier which will inject the different tab pages as the user selects buttons on the <CommandBar>. We will manage what tab is selected by using the Tag property.
Before we can implement the event handler, we need to make a few updates to the constructor and the top of the MainPage.xaml.cs.
- Add a local variable to store the current tab
- Update the
<Frame>control to set the default page on load
1
2
3
4
5
6
7
8
Type currentPage;

public MainPage()
{
    InitializeComponent();
    currentPage = typeof(HomePage);
    contentView.Navigate(currentPage);
}
Once you have updated the top of the file, we can implement the event handler.
1
2
3
4
5
6
7
8
9
10
11
12
13
14
15
16
17
18
19
20
21
22
23
24
25
26
void OnAppBarButtonTapped(object sender, RoutedEventArgs args)
{
    if (sender is FrameworkElement element)
    {
        var tag = element.Tag.ToString();
        Type page = null;
        switch (tag)
        {
            case "Home":
                page = typeof(HomePage);
                break;
            case "Info":
                page = typeof(InfoPage);
                break;
            case "About":
                page = typeof(AboutPage);
                break;
        }

        if (currentPage != page)
        {
            currentPage = page;
            contentView.Navigate(page);
        }
    }
}
Putting it all together, here is the complete MainPage.xaml.cs code
1
2
3
4
5
6
7
8
9
10
11
12
13
14
15
16
17
18
19
20
21
22
23
24
25
26
27
28
29
30
31
32
33
34
35
36
37
public sealed partial class MainPage : Page
{
    Type currentPage;
    public MainPage()
    {
        InitializeComponent();
        currentPage = typeof(HomePage);
        contentView.Navigate(currentPage);
    }

    void OnAppBarButtonTapped(object sender, RoutedEventArgs args)
    {
        if (sender is FrameworkElement element)
        {
            var tag = element.Tag.ToString();
            Type page = null;
            switch (tag)
            {
                case "Home":
                    page = typeof(HomePage);
                    break;
                case "Info":
                    page = typeof(InfoPage);
                    break;
                case "About":
                    page = typeof(AboutPage);
                    break;
            }

            if (currentPage != page)
            {
                currentPage = page;
                contentView.Navigate(page);
            }
        }
    }
}
Test Your App
You should have a working tabbed page implementation in your Uno App, go ahead and launch it any of the platforms to see it in action!
Conclusion
This article covers how to get started with the CommandBar and implementing your own tabbed page manager in the code behind. The advantage to this solution is it allows you to implement your tabbed pages with any control. All you need is event handlers and a <Frame>. The <CommandBar> is a recommendation for getting started with it as it provides many nice features. Personally if I want a truly custom looking interface, I will build out that interface without the <CommandBar> but still implement the same event handler to manage the current page.
If you got lost along the way, I have a code sample on GitHub that you can download.
Happy Coding
